Like we mentioned in our launch video last month, The Gambit is a fun little break-action blaster designed by our friends over at Flux Labs. Compatible with 40MAX or 40WAD green gas cartridges and Old Fusion Designs’ 40mm shells, this makes a great last-ditch effort for the clubs and games that allow air-powered blasters.
Even though it's a simple build, we've had a lot of requests to make one of our crystal-clear video tutorials for the Gambit, which you can watch below.
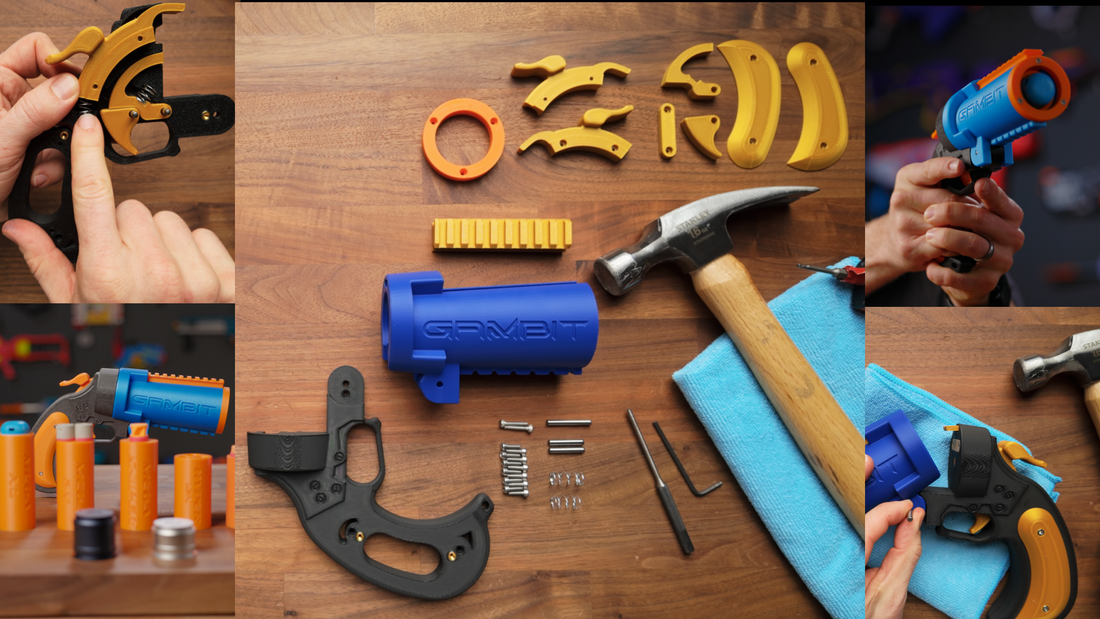
Kit, Tools & Supplies Needed
With that, let’s talk about what you need to complete this build. First you’re going to need our 3D Parts + Hardware Kit, which includes everything you need to build this blaster yourself. It’s worth noting that we don’t currently offer this fully-assembled, so the only way to purchase this blaster is as a kit.
As far as tools, you’re going to need:
- hammer or mallet
- cloth or rag
- pin punch
- M2.5 hex key or driver
- hobby knife
- Slug Slym or other thin silicone lubricant
Without further ado, let's get going!
Primary Assembly
First, we’re going to assemble the front half. Take the rail part and slide it snugly in its slot on the barrel piece. It’s basically locked in place already, but it's going to be held in place by the orange compliance muzzle ring piece, which is secured by three 10mm hex screws with your M2.5 hex driver.

Next, we’re going to assemble the hammer, which is what gives this blaster its break action. Put the two parts together and secure them with two more 10mm hex screws using that same M2.5 driver you used last time.
Assembling the Back Half
Next, taking the two shortest pins in your kit, pound them into their corresponding holes on one of the grip pieces. I find it best to set the piece I’m working on onto a cloth or rag. If you have any issues installing these pins, you can clean/ream out the holes with a hobby knife, but keep in mind you want these pins to fit snuggly so they stay in place.
After you've got those two pins in, you can drop in the firing pin and trigger as pictured, and install the lighter of the two compression springs in its recess. Then, take your assembled hammer piece and drop that in place as pictured, with the heavier of the two compression springs in its corresponding recess. Be careful not to activate the hammer or trigger at this point, as the springs may go flying.

This is the point where you could lubricate the moving parts. It’s not totally necessary, but we have found that the action feels smoother with just a bit of lightweight silicone lubricant, like the Slug Slym we carry on the shop.
Now we're going to put the shell together. Take the other half of the grip, carefully align them with the two pins, and squeeze them together. You can now secure the using two 16mm screws in the grip and a single 10mm screw near the hinge. Additionally, you can take the connector piece and install it above the firing pin with two more 10mm hex screws.

At this point, it's good to double-check that both the hammer and the trigger are functioning. If they stick, you can open it back up to lubricate or shave down the parts so they move freely. However, do note that the process of loading a shell will reset the trigger, so it’s not the end of the world if the trigger or pin does stick a bit. It will break in and get looser over time as you use it, just like any 3D-printed blaster.
Final Assembly
Now, we're going to go ahead and throw the grip scales on using the last four 10mm hex screws in your kit. Finally, combine the front and back half with the longest pin. Place the parts on a towel, and start the pin with your hammer. At some point, it’s best to use a pin punch or other thin object to push the pin so that it sits just barely past flush on either side. It doesn't take a lot of force, so be gentle.

And there we have a fully-assembled Gambit! You can take a shell, charge it up, slot it in the breech, and fire. If you have any questions about the assembly or you get stuck, shoot us an email to orders@outofdarts.com. We’ll do our best to get back to you promptly. – Luke Goodman
